Showing posts with label Do it Yourself. Show all posts

Tuesday, October 22, 2013

Rocking Chair Cushions

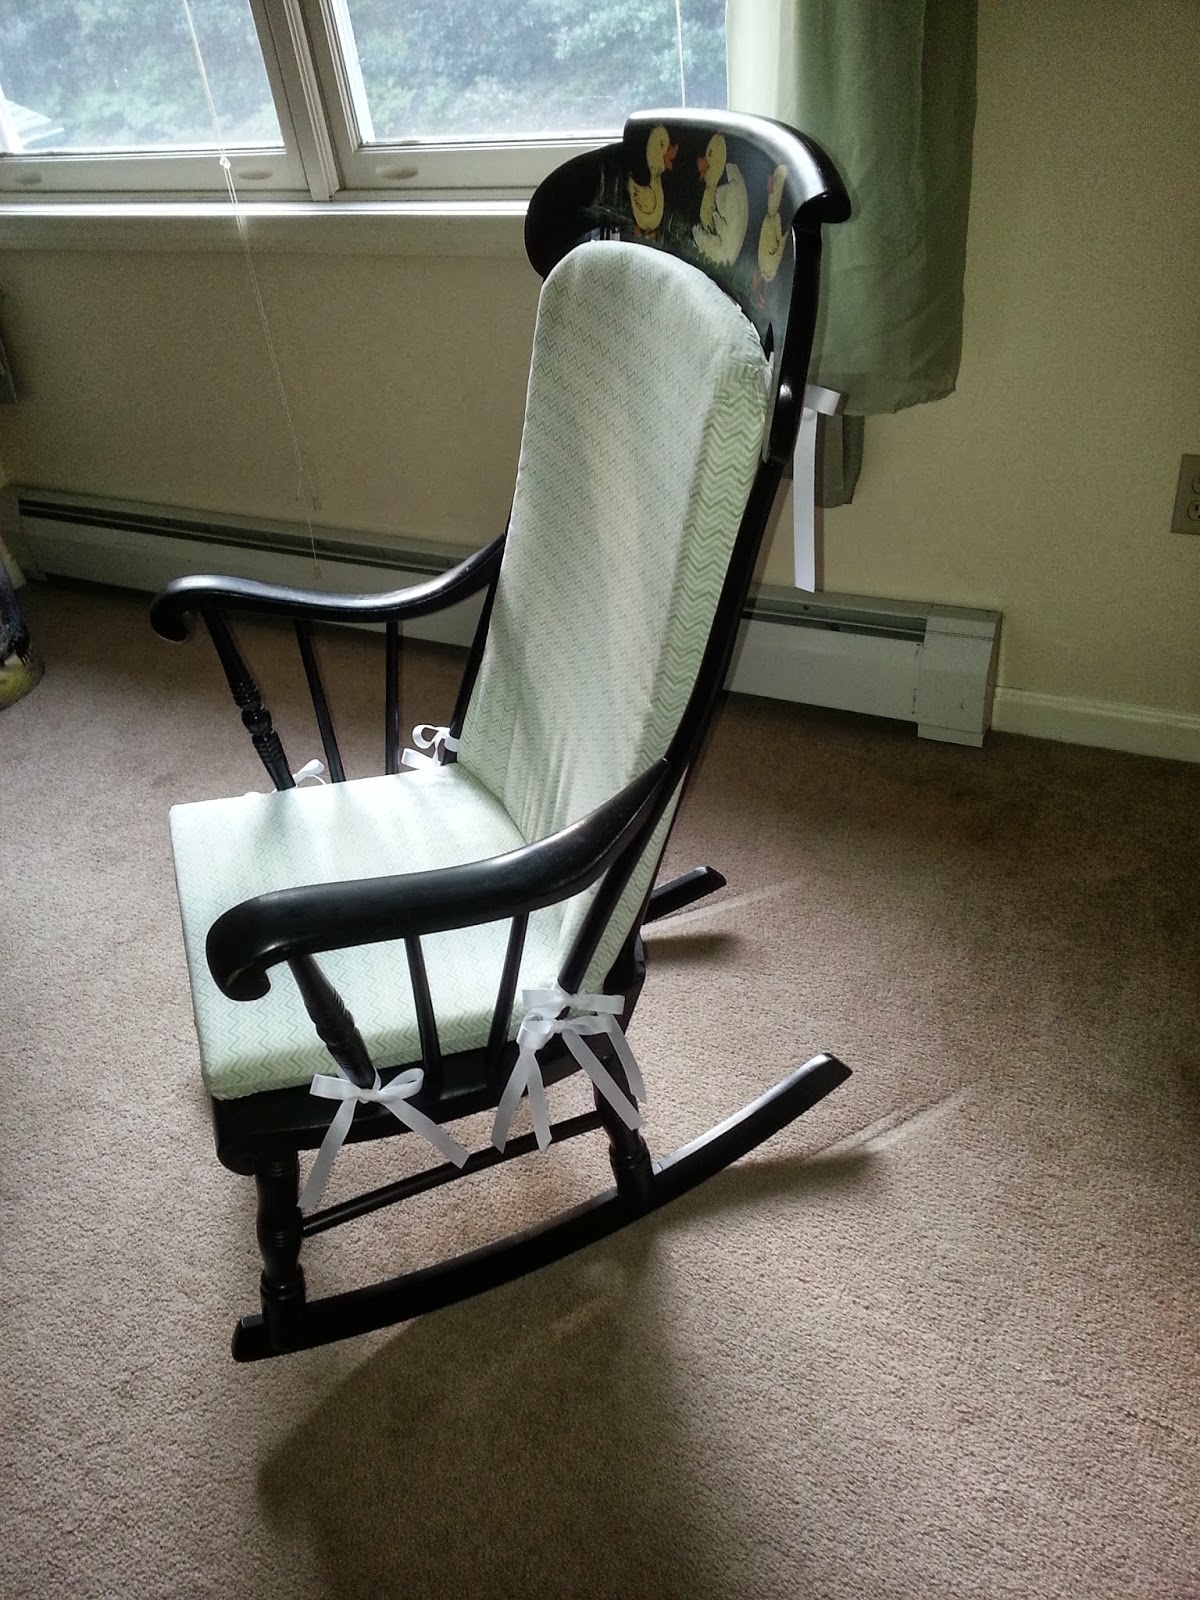
I thought I would share one of my recent craft projects.  Before anyone asks no, we are not expecting but I am having fun building a nursery for the future piece by piece.  Hubby and I have been attending some auctions and yard sales just looking for cool stuff at great prices and after one of the auctions I got the idea in my head that we needed a rocking chair for my imaginary nursery. lol.  After checking craigslist for weeks for a chair that looked nice and yet didn't need much work, I found one that I thought was really cute.  It has little yellow ducks on the back which is totally nursery-esk and not very adult but hey we will have a baby eventually.  I also liked the fact that the ducks are very gender-neutral.

After buying the chair I decided to attempt to make my own cushions for it.  Who knew that rocking chair cushions can cost hundreds of dollars?!  I knew I could make some for cheaper than the retail prices but I wasn't entirely confident on how sophisticated the result would look.  I spent hours researching do-it-yourself tutorials on chair cushions and looking at examples for sale to get ideas on what I wanted mine to look like.  I decided to keep things simple but even so there were a few challenges that I didn't expect.

The first challenge that I encountered with this project was choosing the fabric.  I wanted to pick something gender neutral since I have no idea what gender future baby X will be and I had a feeling I wasn't going to want to repeat this process anytime soon unless I had to.  In order to attempt to include Hubby in my "project"  I asked him to help me to choose a fabric.  I explained to him that I wanted to choose something simple (so that it would not take away from the hand painted ducks) and that I wanted something gender neutral.  Once at the store (and I dragged the poor man to two different stores) Hubby kept suggesting bright busy patterns.  The fabrics were nice but I was worried that they would take the eye away from the ducks.  I struggled to find something that fit the idea that I had in my head.  At first I gravitated towards black or cream based fabrics with subtle patterns but Hubby complained that they were "boring."  He likes color and sometimes gets frustrated with my gravitation towards the basics.  After striking out badly at the first store I went home and did some research on the computer.  The trip to the second store went better.  I still wanted something with a subtle pattern but this time I went for the "nursery fabrics" which had pastel colored patterns.  I found a few that I thought would work and I let Hubby help me pick.  We settled on a fabric with a  green zig-zag pattern.

Challenge two struck when I attempted to cut the fabric.  Silly me assumed that the lines would be printed straight on the fabric and that I could use them as a cutting guide to get my cuts straight... HAHAHA The fabric gods decided to laugh at me.  The lines in the middle of the fabric were straight but as they progressed up and down the fabric they became skewed.  Not only did this pose a challenge to cutting but I didn't want them to look obviously skewed on the final product of my cushions. Call it an obsession with straight lines stemming back to my childhood. (I can still hear my mother lecturing me about how to make the bed so that the stripes in the sheet made straight lines!)

The third challenge was cutting my foam for the back cushion to compliment the curve of the chair back so that they ducks wouldn't be covered up.

Overall, I think my efforts paid off and they cushions came out pretty well.  They may not be perfect but hey I find that even store bought stuff isn't even perfect these days.  Here's my final result!


Front View
Back View


Close Up of Ducks and Fabric Pattern

Sunday, April 22, 2012

Quilting and Cross Stitch

I can't remember if I mentioned this in a previous post but after I finished making my aprons back in September, I began a quilting project.  I wanted to do something with Hubby's old uniforms that he had wanted to throw way because they were worn out or too stained to wear anymore.  I stopped him from taking them to the trash and he was more than glad to give them to me for "craft purposes" lol.  After surfing the net I found a couple of cool ideas including quilts and purses.  I made the purse first awhile back and posted a photo here on my blog.  The quilt has taken me a lot longer to complete partly because I often get frustrated with projects that are not "instant gratification."  I got bored or frustrated and put it aside for months at a time.  However, I finally have it finished!  I know it isn't perfect but in some ways I think that just adds character to it and this IS my very first quilt so cut me some slack?  I think this will be a cool keepsake since the uniforms that I used to make it were the ones that Hubby wore while he was in Iraq.  I think it turned out pretty cool.  The photo isn't the best... sorry!


Awhile back, I also completed and then framed a cross stitch project but I never posted it here so I thought I would now.  I hadn't done cross stitch since middle school when I had done one project but this turned out great!  I think the framing really compliments it too.  Sorry for the glare from the glass on the photo...

Thursday, September 29, 2011

Cradle Restoration

For those that follow my blog, you may recall that one of the projects that I embarked on when my husband left was the restoration of a cradle that my father had built for me when I was born.  Let me reiterate that NO, I am not expecting a baby now or anytime very soon, but my father gave me the cradle since I DO plan to have children sometime in the future and I figured that now was a good time to go about fixing it since a) I have the time and b) I don't need it just yet so there is no pressure to get it done so I can take my time. 

Since the cradle was built, twenty-five years ago, I have to admit that it has taken a lot of abuse from my younger sister and I.  I don't mean the few months that we each slept in it but rather the years after when we played with it and pounded on it as we played with our dolls and stuffed animals.  Still, it is a beautiful piece, in my opinion, and it holds a special place in my heart because my father actually built it.  How many people can say that?  

When I brought it to my house back in May, it wasn't in terrible shape but it needed some love.  It was missing two of the four knobs that once adorned the four corners and had a few cracks in the wood.  The mattress is still in great shape.  After all my sister and I only slept on it for a couple of months a piece and it looks almost new.  I figured all it needed was a bit of time and elbow grease (figuratively speaking) to fix it up.

When Hubby left in June I set about starting the project.  It was a project that I was very interested in and it kept my mind off Hubby's absence, at least for couple of hours a day.  The first step of the project was to find some replacement knobs for the two that had over the years and several moves (this thing endured not just the abuse of two small children but also seven moves) had somehow disappeared.   I feel like the fact that it survived so much says something about my Dad's workmanship.  Kudos to you Dad!  While showing its age, this is a fairly sturdy piece!. 

I wasn't expecting it to be difficult to find replacement knobs.  Think again.  The hardware stores only carried drawer knobs which were much to small or finials which were all pointy (way dangerous for a baby.)  I was slightly discouraged but a kindly employee at one of the hardware stores suggested trying a craft store.  I struck out at the first one but hit pay dirt at the second.  They didn't have the perfectly round wooden balls that my dad had used but they did have what they were calling "wooden doll heads."  These "doll heads" were almost round but had a flat edge on the bottom and already had a hole drilled in for a screw.  They also happened to be the right size.  OK, so they were not entirely round but after talking to my dad he said that he recommended replacing all four knobs anyway so they would all perfectly match and he said that the flat side would actually make it easier to put them on the cradle.  It was a bonus that I would not have to drill a hole into each one.  I  had found what I thought would be the perfect solution! I bought four and drove home feeling triumphant.

Since my new knobs were "naked" my next step was to find a stain that matched the existing stain that my dad had used on the body of the cradle.  For this I enlisted my father's help since he would have a clue as to what wood and color he had originally used.  After a brief trip to Lowe's I came back armed with a small can of Minwax stain, a small can of Minwax polyurethane varnish (to seal the stain and give the wood a shine), and a few foam brushes to apply both products, and some sandpaper.  My dad was kind enough to give me a metal tool called a "key" to open the cans. 

It took me a week to stain and apply polyurethane to the knobs.  It was a long process since I had to wait 8-12 hours between coats of stain.  I went back to Lowe's and picked up some wood putty (I'll get to this in a minute) and some double ended screws to attach the knobs.  I then proceeded to attach each freshly stained knob to a screw.

Unfortunately I could not screw the knobs onto the cradle yet.  When my sister and I were little one of the things that we liked to do was to turn the knobs over and over.  The result was that the original holes in the cradle had been widened so much that two were the width of a finger.  Obviously this was much to big for the new screw.  This is where the wood putty came in.  I pressed putty into each of the four holes to seal them up so that I could create  new tighter holes for the new knobs.  This process again took a week or so because I had to wait for the putty to harden and in some cases I had to fill the holes up a second time because the putty shrank as it dried.  I also took the opportunity to repair a crack in the wood that I had noticed on one of the side panels.  This was a battle scar from one of the moves but after the wood putty it was as good as new.

The next step was to give the body of the cradle a fresh coat of varnish.  I sanded the cradle down first and applied a few coats of stain and varnish.  Then all I had to do was screw on the new knobs and it looked great!

At this point I could have been finished but I decided that I wanted to get a sheet to cover the mattress.  The mattress has cute little pictures on it but I wanted a sheet so that the cradle would be immediately usable whenever the time came.  You would think that this would be a simple matter of going to Target or Babies R Us but apparently cradles are no longer popular.  Bassinet sheets and crib sheets can be found almost anywhere but try to find a cradle sheet and you are out of luck.  Bummer.  I did find a few on Amazon but they were a minimum of $20 a piece for one fitted sheet and the fabrics seemed cheap.  Fortunately, I am competent with the use of a sewing machine.  I decided that I could probably make one.  How hard could it be?

I went to Walmart and bought a simple blue cotton twin flat sheet for $4 and some elastic.  (I think blue is pretty for a boy or a girl and it matches the blankets I had as a baby which my mom gave me.) This was cheaper than buying fabric from Joann's and the fabric was thicker and well perfect for a sheet since that was what it was for. 

At this point,  I stopped the project for several weeks.  I was a little intimidated by my sheet project and put it off.  This week when I embarked on my sewing spree I felt ambitious enough to pick it back up.  After reading a few tutorials online (thanks fellow bloggers!) from moms who had made their own crib sheets I felt confident enough to scale down their directions and make my cradle sheet.  To make a long story short I was able to make two double thickness fitted cradle sheets from the one twin sheet.  I wanted them double thickness so that they would be more absorbent and also so that the pattern on the mattress would not show through the sheet.  By following one of the online tutorials I was even able to make french seams on the corners so that the raw edges would never fray and the two sheets fit perfectly!  I have to admit, I am a little impressed with how they turned out.  In fact, I think they seem better quality than some of the crib sheets that I saw in Target.  Not to mention, that I made both sheets for under $6.  You can't beat that price!  If anyone wants more information on how I made the sheet (if you want to make your own) let me know.  I would be happy to give more details but I didn't want to bore anyone!

My cradle restoration is finally done and I am very happy with how it has turned out.  The cradle is beautiful and the sheet adds that final finishing touch.  My favorite feature of the cradle is the way that it gently rocks side to side.  Looking at it I can picture myself laying a baby in it one day and being proud to tell my future child one day that his or her grandfather made the cradle that he or she slept in.


Bottom of my cradle sheet


Fitted cradle sheet corner

Finished Product :)

Monday, September 26, 2011

Sewing Spree

In the past week I have suddenly been on a sewing kick.  For some reason it seems like my desire to be crafty comes and goes in spurts.  In any case, inspiration to do some sewing projects hit last week and I went to the closet and dragged out the sewing machine.  I wanted to make some aprons.  You may think I am nuts but I only had one and I use it all the time.  I bake a lot and also like to make meat sauce for spaghetti.  Tomato sauce have a tendency to splatter and stain your clothes and being able to wipe my hands on an apron helps me use fewer dishtowels when I am baking.  I had looked at Target and Walmart for an apron that I could buy but the ones I found were either hideously ugly or so thin that I felt like they were useless.  After searching online I finally found one that looked like it had potential but when I saw the $30 sticker price I thought... yeah right!... $30 for an apron that I could probably make myself?  Then it dawned on me.  I could make one myself!  So I visited Joann's and bought some supplies and set about my projects.  I decided to make two aprons.  I wanted one full length one and a second one that would be one that just went around my waist.  It took me about two days to make each one.  Not because they were particularly difficult, but because I didn't spend all day working on them.  I have to admit that I am pretty happy with the results.  Next time I will probably makes a few adjustments to my pattern but all in all I think they came out well :)  Can't wait to try them out!


Thursday, July 14, 2011

Alternative Use For Vegtable Oil.... Who Knew?!

As you know I have been working on restoring a wooden baby cradle that my father made for me when I was a baby.  I'm doing great on the project and have made a ton of progress.  In fact, I am fairly close to being done.  Today I went over the entire cradle with a fresh coat of polyurethane and when it dries it will only need one more coat to finish it up and the knobs screwed on.

As I painted on the polyurethane I managed to get some on my arm.  Yes I was wearing gloves but I managed to get up above the glove when I reached under the body of the cradle to reach the rocker underneath.  I probably should have been wearing long sleeves to do this project but it was around 104 degrees out today so I wasn't really seeing that as a viable option so I decided to just go for it. 

This isn't my first time using the stuff.  For the past few weeks I have been working on painting the knobs to the cradle and last time got it all over my fingers (that time I hadn't worn gloves - lesson learned.)  It made my fingers perpetually sticky and nothing I tried seemed to get it off.  I even tried Comet bleach.  I eventually got it off using the Comet, massive amounts of hand scrub/exfoliator, and basically scrubbing my skin off.  The next day I went to Lowe's to find out how to properly remove it for the next time I managed to get it all over myself.  Their solution was to use paint thinner or mineral spirits (basically very similar to paint thinner.)  Yeah... I am so not pouring paint thinner on my hands.

After not being to thrilled with what Lowe's had to say I went to Google and asked the web for alternative suggestions.  After an hour or so of reading/researching I found a few posts from moms saying that they had used vegetable oil which is then easily washed off with regular soap to remove the sticky polyurethane substance.

When I got the sticky paint all over my arm today I was less than pleased with myself and was not looking forward to repeating the skin scrubbing experience.  Then I remembered what I had read about the vegetable oil and figured I would try it.  I didn't have much to lose and if it worked it would be much better than the alternative so I figured why not?

I grabbed the vegetable oil out of the cabinet.  I keep it on hand because I use it for baking and for making waffles on lazy Saturday mornings.  I poured some into my hand and rubbed it all over my arm where the polyurethane had already dried into a sticky patch.  After rubbing the oil all over the area I proceeded to wash it all off with regular hand soap at the kitchen sink.  

Sure enough not only did the oil wash right off but all traces of the sticky polyurethane were gone.  To boot my skin was left soft feeling instead of raw and red from scrubbing and the entire process took less than five minutes.  I was thrilled.  Who knew you could use ordinary vegetable oil to painlessly get sticky paint off your skin???  AWESOME!!  Thank you Google moms!!

Tuesday, July 5, 2011

Wind Chime

Before I went to May's BBQ yesterday I decided that it was a good day to put up the wind chime that my parents had recently given me.  Up until now it had been hanging temporarily on my mailbox but it really needed to be mounted and hung from the top of my porch.  So I dragged the tall ladder out of the garage and set about making it the proper height and adjusting it against the side of my porch.  This took several minutes but I figured it out and got out the hook and my husband's hammer.  As I was about to climb up the ladder I noticed that a group of Navy AIT students had stopped to watch me.  I live on a military post and it is a pretty common occurrence to see AIT students walk by my house throughout the day.  Today however, this particular group of guys did not keep walking.  Instead, they literally stopped to watch what I was doing from across the street.  I decided to ignore them and proceeded to climb up the ladder.  Once I had climbed up as far as I felt was safe I began to screw the hook into the roof of my porch.  I won't lie and pretend like it was really easy.  It did take me a few tries especially since I was trying to only use one hand so I could hold on to the ladder with the other.  While in the midst of struggling to attach the hook I glanced over my shoulder and noticed that the group of AIT students was STILL watching.  I started to get a little annoyed.  I felt like telling them that if they were going to watch then maybe the could lend me a hand?  But they hadn't offered any help and I wasn't expecting them to any time soon.  I sighed and went back to my task.  The Navy guys did not leave until I had finished and had successfully hung up my wind chime.  I was proud of myself for getting the chime up by myself and I am happy with the way it is hanging.  Later that day when I spoke to my mom she was shocked that I had climbed the ladder without any help.  Even though I am proud of what I accomplished and feel like I once again proved that I am not helpless without Hubby, I wanted to put this out there to the Navy AITers that watched me struggle.  Next time that you see a woman struggling to do a task that she would probably normally have help with, why don't you offer to lend a hand?  The worst that she can say is no thanks and she might appreciate the offer.  Her hubby might be away and unable to help her out.  Just don't offer in a way that makes it seem like she needs your help because she can't do it by herself.  Offer because you know that you would want someone to look out for YOUR family if you couldn't be there to help.

Sunday, July 3, 2011

Dear Hardware Employee - Post #2

Dear Lowe's Employee,

Please refrain from arguing with me about the rules and regulations surrounding what I can and cannot drill into the walls and exterior of my home.  I live here and have read the rules in my lease and I think I would know more about this than you.  In addition, I have a much better idea of what I need for my current project than you do.  You didn't even ask me the details of what I want to do and are continuing to argue with me about it.  Furthermore I do not appreciate being lectured as if I am a five years old.  Just because I am a woman does not mean that I am stupid or incapable of drilling a screw into a wall.  Please do not insist that I need a cart to push around my intended purchases.  If I need a cart I will get one.  If not I am fully capable of carrying my purchases myself.  There is also no need to stare at me while I browse your merchandise.  I promise not to touch anything that will hurt me, make a mess, or steal anything.  If I need your help I will not hesitate to ask you.  Do not be surprised that I know my way around a hardware store.  This is not my first visit nor will it be my last.

Sincerely,

A very capable Army Wife

Thursday, June 30, 2011

Army Wife = Jack of all Trades

My Mom always told me to find a guy who isn't "useless."  She considers a man "useless" if he can't screw in a light bulb, do simple household chores, and mow a lawn.  Needless to say my husband is a far cry from "useless" and he is very handy around the house, especially when it comes to fixing and installing electronics.  However, when my hubby is gone it doesn't matter how many things that he is great at because he isn't here to do any of them.  Not that this is his fault by any stretch of the imagination but when a soldier is deployed everything falls on the spouse.  This means that we can't just be skilled homemakers, cooks, cleaning ladies, chauffeurs (for those with children), accountants, and lovers (things which we master on a daily basis) but we also have to become carpenters, electricians, plumbers, and the one who takes out the trash.  (More on taking out the trash to come in a later post)  Since my husband has left I have decided to take on several DIY/home improvement projects.  Here are two projects that I am currently working on and one that I recently completed.

Project 1: ACU Book Bag
Status: Completed

Before hubby left he decided that several of his ACU uniforms needed to be retired.  Some were stained in places, others had rips and tears, and yet others had odd faded spots that his unit had deemed "unacceptable" even though they had only become that way through constant washing and wearing and not something he had done to them.  He was about to take these "rejects" out to the trashcan when I stopped him.  Yes, these uniforms had definitely seen better days and after three years as an active duty soldier it is no wonder that they needed replacing.  However, as someone who knows her way around a sewing machine I thought there may still be some life in them.  I asked him if it was legal to cut up the uniforms and re purpose them for something else.  The army has all sorts of rules about uniforms and things and I certainly didn't want to get myself or my soldier into trouble.  He looked at me like I was nuts and told me I could do whatever I wanted.  Excited I gladly took the rejected uniforms and stowed them away in our spare closet.  My first thought was to make a quilt with them.  These uniforms had served my husband well on his last deployment and I thought it would make a cool keepsake. 

After leaving my husband at the airport on deployment day I returned home and was determined to stay busy so that I would not be tempted to dwell on the fact that he was gone.  I dragged the retired uniforms out of the closet and began pulling them out of the bag that I had placed them in.  I won't lie, the first thing I did was to hold one up to my face and close my eyes imagining that I was snuggling up to my hubby but I forced myself out of my pity party and tried to decide how to start.  After a few minutes I decided that maybe the quilt project was just a little too ambitious for day one.   A few days earlier while my husband had been at a job fair I had googled ideas on what to do with recycled ACUs.  Most of the hits that came up were about purses or bags made out of ACU fabric.  This I could do.  This was a project that was both functional, meaningful and that I could complete in  few days versus the quilt project that would take much longer.  Using some blogs and photos from the Internet for inspiration I took apart one of the old uniforms and pieced it back together to fashion a book bag.  I added my own name tapes and a pink ribbon strap to make it feminine and even requisitioned the old zipper from the ACU shirt for the top of the bag and side pockets for the front (hard to see in the photo).  Below is the end result.  I have removed the name tape with my name on it to preserve my anonymity. I still want to make a quilt and have several more uniforms to work with but that will be a project for another day.


Project 2: Take Up Carpentry to Fix Handmade Baby Cradle
Status: Work in Progress

About ten days before deployment day hubby and I went to visit my parents and were given quite a bit of furniture.  They had just moved and downsized to a smaller home.  Unable to fit all of their furniture, they gave us some of the items that did not fit and we happy to have them.  One of the items that my parents gave us is a handmade baby cradle that my dad built for me when I was a baby.  Before I go any further let me clarify that my husband and I do not currently have any children, nor am I expecting but we would like to have children in the future.  Knowing that being in the army, the likelihood of us moving when  hubby returns is great, my parents decided to give us the cradle now since we live a drivable distance so that we would have it when we are ready for it.  I was excited to have the cradle but having been used by both my sister and myself and then been played with and stored for several years, it has seen better days.  My dad always told me that when the time was right he would fix the cradle back up so that my future children could use it however he is very busy.  Now that it is in my home and I have oh just a little extra time to spare, I thought this was a perfect time to take up carpentry.  The cradle has four wooden knobs that go on each corner and over the years two have disappeared to who knows where.  In addition my sister and I used to love to turn the knobs and we turned them so much that the screws eventually wore big holes in the wood loosening the tight seal around the screws and allowing the knobs to fall off.  There is also a minor crack in one side due to a series of nine state to state moves.  After several visits to our neighborhood Lowe's and conferring with my dad I have begun the cradle's restoration.  I found replacements for the missing knobs at Michael's and today I plugged the over sized screw holes with wood putty.  While waiting for the wood putty to set I began staining the wooden knobs to match the rest of the cradle.  They are currently drying so the project has been put on hold.  I will post an update soon with photos but I have to say so far I have learned a lot about wood working and am feeling very accomplished in my new skills.

Project 3: Home Decor
Status: In progress

Among the items my parents gave us are some framed photos, art, and home decor pieces.  Since hubby has left I have had a renewed desire to put up photos on the wall and to improve the decor of our home.  In the past I have made curtains for our house and engaged in other home decor related projects and now that I have more items to work with I am excited to add them.  My bathrooms feel especially drab and I am looking forward to livening them up.  More updates soon.

I can't claim to be an expert seamstress, carpenter, or home decorator but I do think that I can hold my own.  Army wives can't just sit around and wait for their husbands to get home and change the light bulb.  For most of us the thought to just wait for hubby to do it probably only briefly crosses our minds before we walk to the closet, get out the spare bulbs, and change out the old one ourselves before our husbands even realize that it had been burned out.  While they serve our country they can be confident that we are strong enough, tough enough, and determined enough to hold down the fort at home.  We may have to ask for help but I think you will find that we are quick learners.  We have to be!!  Have I mentioned that we are also amazing multitaskers?

"I Am Woman. Hear Me Roar."